Adding Complex Features
While the walk thru provides a simple overview of creating and shipping records in NRGship, it is likely that you may need to create complex shipments which include third-party/recipient billing and/or international shipping. By adding additional logic to your scripting you can easily add support for complex shipments.
Saturday Delivery
For Saturday Delivery option, set field UPS_Ship::SaturdayDelivery to "1"
UPS.com - Saturday Delivery
Third Party/Bill Recipient/Consignee
Often the recipient will want to bill shipping on an alternate account. In order to facilitate this type of shipping, set the following fields in the UPS_Ship table:
UPS.com - Billing Options
BillToRadio [My UPS Account|My Credit Card|Receiver|Third Party|Consignee]
BillToUPSAccountNumber
BillToPostalCode
BillToCountry
Alternate Account
If you have multiple accounts setup in NRGship and you'd like to script shipping from an alternate account, you can set the field UPS_Ship::Account_Alias to one of the account alias values from Preferences.
COD Shipment
To ship COD, the payment method is still the shipper but in the Packages table you will set the CODAmount field to the total amount that should be collected, including any shipping costs. If you will only accept Cashiers Check or Money Order as payment, set field Packages::CODCashiersCheckMoneyOrderOnly to 1. Note that the CODAmount is per package - you should set each package value if sending multiple packages.
UPS.com - COD Shipping
Multiple Packages
If you have package data in your solution, you can easily create additional related records in the UPS_Ship_Packages table. Rather than the 1:1 relationship from the Basic integration, a more complex script could be utilized to create additional records in the UPS_Ship_Packages table by setting the value of UPS_Ship_Packages::Ship_ID to the value from UPS_Ship::Ship_ID
For example, in your ship script, after you create a record in UPS_Ship you could set a variable $ship_id to the incremental UPS_Ship::Ship_ID.
When you are ready to create packages you can switch over to a layout based on UPS_Ship_Packages.
For each package, create a new record and set the UPS_Ship_Packages::Ship_ID value to the variable $ship_id.
Next, set all of the package values like weight, dimensions and reference number. Remember to commit the record after setting these values.
Post-shipment, if you wanted to grab all tracking numbers you could use a custom function like GetNthRecordSet and call using GetNthRecordSet ( UPS_Ship_Packages::Response_TrackingNumber; 1 ; UPS_Ship::z_PackageCount.cn ) to get a list of all tracking numbers for the shipment.
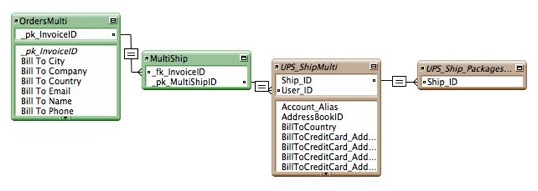
Multiple Shipments (for CRM or Backorders on Invoices)
If you would like to do multiple shipments from a CRM system (ex: Contacts) or an invoice /order database where you split shipments due to back orders, then you will likely want to create an interim "join" table between your table and the NRG tables.
Simply create a new record in the join table and then create your related record in UPS_Ship based on this ID instead of the primary key in your contacts or invoice table.
Thru a portal of the MultiShip table you could easily display each shipment's master tracking number along with associated costs.
Drop Shipments
You may want to create shipments that have an address displayed on the label that is different from the actual sending location. In order to facilitate these shipments, you will need to set values in these fields in the UPS_Ship table:
# These are the fields which will appear on the printed label
Shipper_Name
Shipper_AttentionName
Shipper_AddressLine1
Shipper_AddressLine2
Shipper_City
Shipper_StateProvinceCode
Shipper_PostalCode
Shipper_Country
Shipper_PhoneNumber
# These fields are used for rating purposes
ShipFrom_Name
ShipFrom_AttentionName
ShipFrom_AddressLine1
ShipFrom_AddressLine2
ShipFrom_City
ShipFrom_StateProvinceCode
ShipFrom_PostalCode
ShipFrom_Country
ShipFrom_PhoneNumber
NOTE: Some international shipments MUST display the actual origin address.
Email Notifications
By setting a valid email address in UPS_Ship::ShipTo_EmailAddress and UPS_Ship::Email_SendEnabled to 1 then the information will be passed to UPS for automated notifications based on your NRGship preferences.
You can set specific notification types for the shipper by setting UPS_Ship::Email_Notifications1 to values Ship|Exception|Delivery (return delimited)
You can set specific notification types for the recipient by setting UPS_Ship::Email_Notifications2 to values Ship|Exception|Delivery (return delimited)
You can set the Sender's Name by setting UPS_Ship::Email_Sender, along with UPS_Ship::Email_Siubject and UPS_Ship::Email_Message
It may be preferred to take the post-ship UPS_Ship::Response_ShipmentIdentificationNumber value and send out notifications from your own database so that you can include supplemental order information.
UPS.com - Notification Services
Custom Messaging
By setting field UPS_Ship::LabelDocTabContent you can override the default values for label customization. Valid values are:
None - No extra data
Shipment Label Header - Prints shipment info at bottom of 4x8 or on 4x2 label below ship label
Customer Label Message - Prints custom text at bottom of 4x8 or on 4x2 label below ship label. Often used for gift box messaging
Logo - Prints a 4x2 logo at bottom of 4x8 or on 4x2 label below ship label
QR Code - Prints a QR code and additoinal text at bottom of 4x8 or on 4x2 label below ship label
In addition, these fields can be scripted when using the options above.
Label_MessageReverse - Text that appears in reverse on lower portion of 4x6 label
Label_MessageA - Generally something like "TO: NAME"
Label_MessageB - Generally something like "FROM: NAME"
Label_MessageLongText - Some long text which will get wrapped
Label_MessageSize - Font size for MessageLongText
Label_Logo - 4x2 PNG for logo
Label_QR_URL - URL for QR code
Label_QR_BigText -Larger text next to QR
Label_QR_Text - Smaller text next to QR
Label_DocTabText - Text which will appear on Shipment Label Header
Label_BigArrowText -
Label_BigText -
Shipper Release
By setting field UPS_Ship_Packages::ShipperRelease to value "1" (checked) UPS will deliver the package with no signature required.
UPS.com - What is Shipper Release?
Delivery Confirmation
By setting a value UPS_Ship_Packages::DeliveryConfirmationType UPS will provide Delivery Confirmation services. Note that Delivery Confirmation is a paid service so any option other than "-Choose-" or "" will incur fees.
UPS.com - Delivery Confirmation
Additional Reference Fields
By setting a value UPS_Ship_Packages::ReferenceNumber3, UPS_Ship_Packages::ReferenceNumber4 or UPS_Ship_Packages::ReferenceNumber5 additional data can be passed to UPS for packages that will not print on the ship label, but will appear in billing data. This makes it possible to pass additional data to reconcile with that will not print on the label.
Return Shipments
By setting a value in UPS_Ship::ReturnService to one of the value below, you can easily create return labels that can be printed or emailed to your customer. The label type will be based on your default preferences. If you normally generate a thermal label, but would like to produce a label for email use, you can set the value of UPS_Ship::LabelType to "Laser". You can then print using the OS to a PDF file, or use alternate FileMaker scripting to create an email.
UPS.com - UPS Returns
UPS Print Return Label
UPS Electronic Return Label
UPS Print and Mail Return Label
UPS Returns Plus (Call Tag) - 1 Attempt
UPS Returns Plus (Call Tag) - 3 Attempts
UPS Access Point
By setting values in the Ship table, you can setup deliveries to UPS Access Point locations. You will first need to capture the location information and AccessPointID values so they can be set in NRG. These can be obtained thru the UPS Locator API and generally would be implemented on your website. The fields below would then be populated based on your needs.
UPS.com - What is a UPS Access Point?
AlternateDeliveryAddress_Name
AlternateDeliveryAddress_AttentionName
AlternateDeliveryAddress_AddressLine1
AlternateDeliveryAddress_AddressLine2
AlternateDeliveryAddress_AddressLine3
AlternateDeliveryAddress_City
AlternateDeliveryAddress_StateProvinceCode
AlternateDeliveryAddress_PostalCode
AlternateDeliveryAddress_Country
AlternateDeliveryAddress_UPSAccessPointID - Value from UPS for the Access Point
DeliverToAddresseeOnlyIndicator - Set to 1 if true
AlternateDeliveryAddress_ResidentialIndicator - Set to 1 if true
AlternateDeliveryAddress_POBoxIndicator - Set to 1 if true
Complex Printing
If you have multiple users with multiple output devices, you can control label output with finite control by setting several fields.
Ship::LabelType - Thermal|Thermal DocTab|Laser|Zebra|Zebra Doctab|Eltron|Eltron Doctab
Ship::Output_PrinterName - If has a value, will override advanced printing default
Ship::Output_IPNumber - If has a value, will override default value with given IP #
Ship::Output_Username - Username for thermal printer if IP
Ship::Output_Password - Password for thermal printer if IP
Ship::Output_WindowsPort - If has a value, will override default value with given port
Ship::Output_ShipAndPrint - If ship and print is disabled in prefs, set this value to 1 and it will ship & print
Ship::Output_PrintDialogs - If dialogs are disabled in prefs, set this value to 1 and dialogs will appear
Labels to PDF
NRGship can provided ether Laser or Thermal images for output to PDF files. Simply call script "External - Get labels as PDF for Ship_ID" with the proper ID and labels will be created on the desktop named "tracknum.pdf".
Simple International Shipments
If you are already producing international paperwork outside of NRGship then you can easily produce international shipments by providing a value in the two fields below. Note that you can fully automate international shipping by following the Full International Shipment information.
Description - Description of goods
InvoiceLineTotal - Total value of goods
Full International Shipments
NRGship provides the ability to printed or electronic commercial invoices. In order to populate the line items for a commercial invoice, you will need to create a relationship from UPS_Ship to UPS_Ship_IntlProduct based on UPS_Ship::Ship_ID to UPS_Ship_IntlProduct::Ship_ID. In the UPS_Ship_IntlProduct table, you will want to populate the following fields:
Unit_Number (Quantity)
Unit_Value
Unit_UnitOfMeasurementCode (Normally, "Pieces")
PartNumber
Description
CommodityCode
OriginCountryCode
In addition to the basic ship values you may also need to populate additional fields in the UPS_Ship table:
Description
InvoiceLineTotal
SoldTo_Name
SoldTo_AddressLine1
SoldTo_AddressLine2
SoldTo_City
SoldTo_StateProvinceCode
SoldTo_PostalCode
SoldTo_CountryCode
SoldTo_TaxIdentificationNumber
Shipper_TaxIdentificationNumber
International_ExportDate
International_InvoiceDate
International_CountryOfUltimateDestination
International_ReasonForExport
International_DeclarationStatement
International_TermsOfSale
International_Forms_Invoice [Invoice|Partial Invoice]
International_AdditionalDocumentIndicator [1 if checked]
International_Forms_Other [NAFTA|CO|SED]
International_Discount_MonetaryValue
International_FreightCharges_MonetaryValue
International_InsuranceCharges_MonetaryValue
International_OtherCharges_MonetaryValue
International_OtherCharges_Description
ItemizedPaymentInformation_BillToRadio [Shipper|Receiver|Third Party]
ItemizedPaymentInformation_AccountNumber
ItemizedPaymentInformation_BillToPostalCode
ItemizedPaymentInformation_BillToCountry
Please consult the International layout for additional fields to populate when using NAFTA, CO or SED.