Creating Shipments Using Courier Service
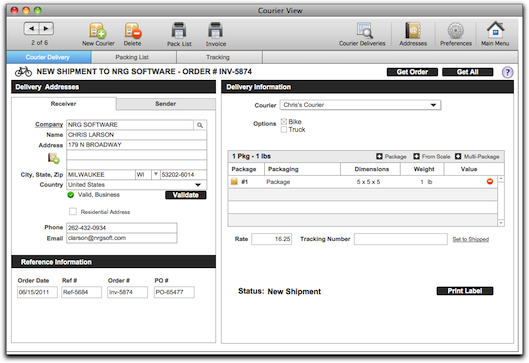
The main window is straight-forward and easy to use. Just click the New Courier icon to create a new shipment. Sender address and default shipment preferences will pre-populate to get you started. Below you'll find an overview of each of the main window components.
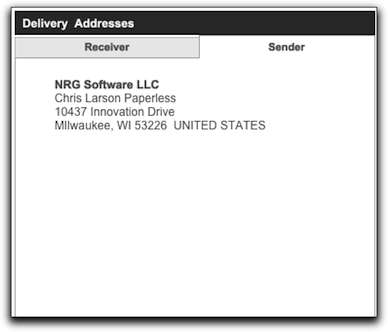
SHIPMENT ADDRESSES
Sender - The sender info is pre-populated with the location address from the workstation preference.
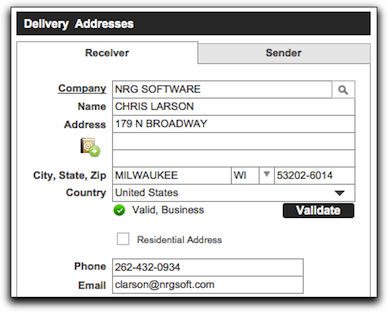
Receiver - Simply add the address by typing in the fields or selecting from the address book, by clicking on the search icon next to the company name field.
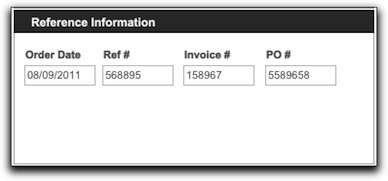
REFERENCE INFORMATION
Reference Information - The additional reference fields allows you to track your information for the specific shipment.
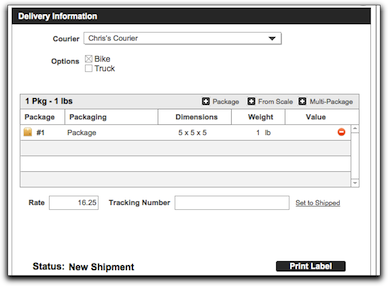
CREATING YOUR SHIPMENT
The right side of the screen is where you enter your shipment details.
Select Courier and Options
To select a courier simply click on the pull down menu and highlight your courier of choice. You then can chose which option you would like for the shipping method. Courier information, including name and options are setup in the Carriers tab located in Preferences.
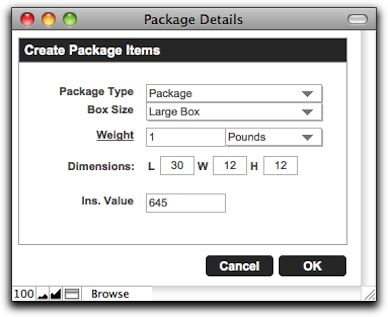
Single Package Shipments
Click on the Package icon in the Shipment info area. A pop-up window (see below) will appear and you can enter the package type, box size, weight, length, width height and insurance value. Click "OK" and the package will be added to the shipment records.
You can also click on the From Scale icon and it will automatically input the weight from the item on your connected scale.
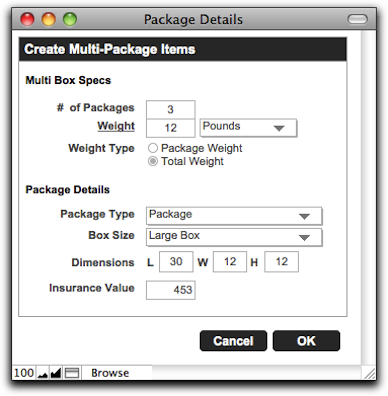
Multi-Package Shipments
If you have shipments with multiple packages, simply click on the Multi-Package icon in the Shipment info area. A pop-up window (see below) will come up and you can enter the number of packages, total or per box weight, and then add dimensions if the boxes are all the same size, along with the insurance value. Click "OK" and the boxes will be added to the shipment records.
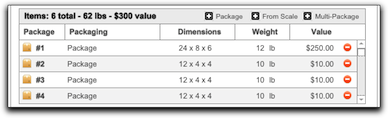
You can click on the Package icon in the list to bring the pop-up back and edit the package details. If you would like to delete a package simply click the minus sign under the value header for the package.
Rates and Tracking
You will have to input all rate and tracking information for Courier Shipments.
SET TO SHIP
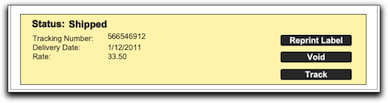
Once you have selected your courier and finished the delivery information you can set your shipment to shipped. This status will only set to shipped if there is a tracking number in the field. The status will change to shipped and then you can reprint the label, void or track the package.
TRACKING A SHIPMENT
The Tracking Tab will go directly to the website you put in for the courier information under Carriers in Preferences.